Items

Here you can create a new type of items like:
- Weapon
- Armor
- Consumable
- Material
- Junk
- Quest
- Bag
- Container (not available yet)
- Ammo
Some are just for logical categories like material, consumable, junk or quest, they all share the same attributes, but there are also very specific elements like Weapons which have additional attributes like a subtype of weapon (axe, sword, staff, bow, etc.).
Weapon and Armor
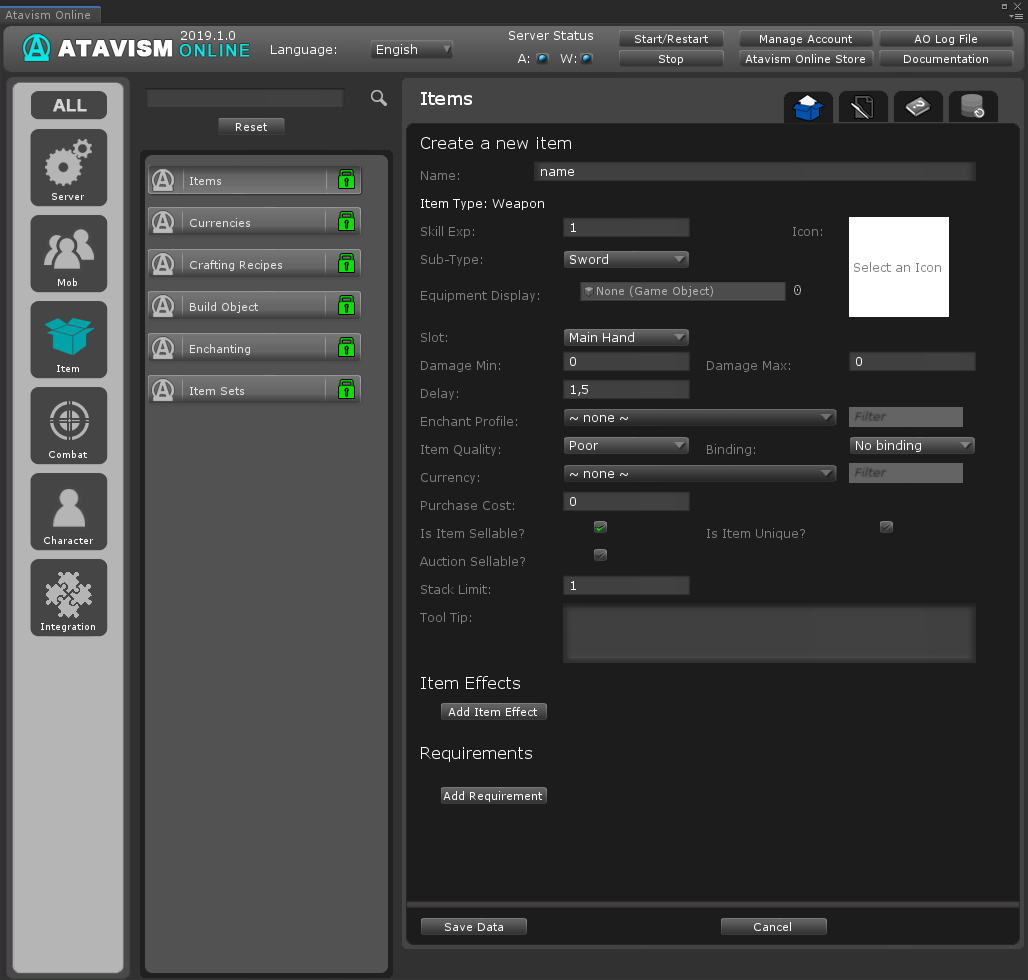
Create a new item
Name: Name of new item
Item Type:
- Weapon
- Armor
Subtype: Select from the list which can be defined in Option Choices Plugin
Icon: The icon that will be drawn in the GUI for the item.
Equipment Display: Drag a prefab that has an EquipmentDisplay component on it. Only used for Weapons and Armor to set how the item looks on the player when equipped. Detailed information on how to configure it can be found in the section below: Configuration.
Slot: What slot the item is equipped to. Only used for Weapons and Armor.
Damage Type: The type of damage this weapon does. Only used for Weapons. (only for Weapons and Ammo)
Damage Min – Damage Max: The amount of damage this weapon increases the player damage by (random value from min-max)(only for Weapons and Ammo).
Delay: How long the player must wait between Auto-Attacks when the weapon is equipped. Only used for Weapons.
Enchant Profile: From the list, you can select Enchant Profile which will be used during enchanting to change item attributes.
Item Quality: The quality of the item, higher quality items should be harder to find, and be more expensive. Does not have any effect by itself. Affects color configuration like a border around icon in a backpack or on your character, but also tooltip name color which is described in the Base Configuration Section. Item Quality list can be defined in the Option Choices Plugin.
Binding: Defines the binding behavior of the item. Equip means the item cannot be given to another player once it has been equipped. The pickup means the item cannot be traded as soon as it has been picked up by the player.
Currency: What currency is used to buy and sell the item.
Purchase Cost: How much it costs to buy the item using the specified currency. This is the full price value for purchase and based on that value selling price will be calculated.
Is Item Sellable? Can the item be sold?
Auction Sellable? Can the item be sold on the auction?
Is Item Unique? A player can only have one of an item that is unique. (not working currently)
Stack Limit: How many of the item can be stacked together in a single item slot.
Tool Tip: A description of the item that players can view on the GUI
Item Effects
Add Item effect: optional
Effect # Type: The type of effect the item has when equipped or used. Currently supports:
- Stat (allowing selecting statistic like Strength, Intelligence, Vitality, Health, Mana, Defense and rest defined in the Stats Plugin)
- UseAbility (activates an ability when clicked)
- AutoAttack (replaces the players AutoAttack when equipped)
- ClaimObject (build an object from an item, if required materials are present in the backpack)
- CreateClaim (defines claim size numeric value, if clicked in the world allows a player to get a claim to the piece of land with specified size value)
- StartQuest (select quest from the list)
- Currency (select currency from the list) – automatically convert the item to the selected currency one to one
- BuildingMaterial (numerical value, defines health for building material) (currently not working)
- UseAmmo (Select Ammo type)
- Weight (how much weight that item has)
- Durability (value)
- CraftsItem (select craft recipe, so this item will act like craft recipe item, if you hover over that item then tooltip will be presented with information taken from recipe definition from Crafting Recipes Plugin like materials required to craft result item and also result item itself with its parameters to inform player what he will gain by crafting that item)
- DeathLossChance (define chance value to drop this particular item on death, number between 0 and 100)
- Sockets (select socket type and define number of sockets of this selected type. This is used if you want that the item with this effect could be socketed)
- SocketsEffect (define socket type, which configure socket material used during socketing process in game)
- Blueprint (defines if the item with this effect should be used in the crafting system as a learnable recipe)
- Parry (effect only for weapons, if this effect will be set for the item, then it will be possible to parry attacks using parry calculations defined in the damage plugin)
You can add multiple effects.
Requirements
Add Requirements – optional
Type: Type of requirement selected from the dropdown list that currently contains:
- Level (level of requirement – specify needed level)
- Skill Level (select skill and level of this skill, defined in Skills Plugin)
- Race (Select race from the list, defined in Option Choices Plugin)
- Class (select class from the list defined in Option Choices Plugin)
- Stat (Select statistic from the list and required value of this stat for the player that should have, defined in Stats Plugin)
You can add multiple requirements.
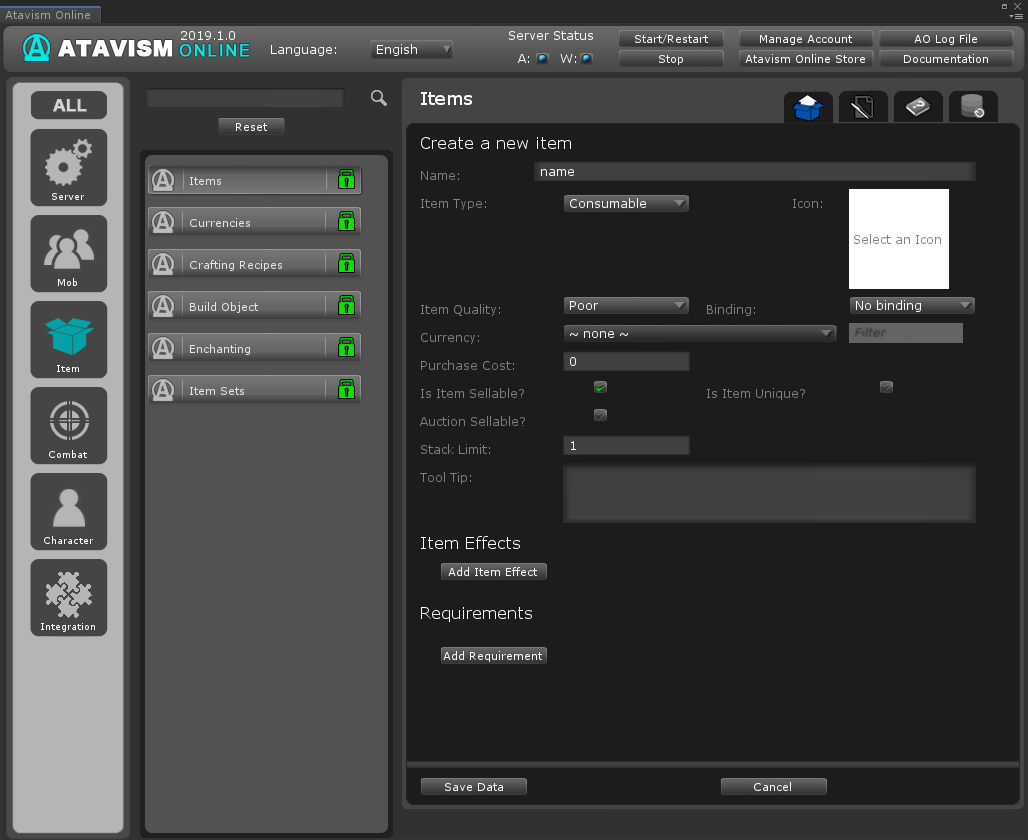
Create a new item
Name: The new item name.
Item Type:
- Consumable
- Material
- Junk
- Quest
- Container
- Bag
Icon: The icon that will be drawn in the GUI for the item.
Item Quality: The quality of the item, higher quality items should be harder to find, and be more expensive. Does not have any effect by itself.
Binding: Defines the binding behavior of the item. Equip means the item cannot be given to another player once it has been equipped. The pickup means the item cannot be traded as soon as it has been picked up by the player.
Currency: What currency is used to buy and sell the item.
Purchase Cast: How much it costs to buy the item using the specified currency.
Is Item Sellable? Can the item be sold?
Auction Sellable? Can the item be sold on the auction?
Is Item Unique? A player can only have one of an item that is unique. (not working currently)
Stack Limit / Slots: How many of the item can be stacked together in a single item slot. In case of Bag, it defines a number of slots in the bag (bag size).
Tool Tip: A description of the item that players can view on the GUI.
Item Effects
Add Item effect: optional
Effect # Type: The type of effect the item has when equipped or used. Currently supports:
- Stat (allowing selecting statistic like Strength, Intelligence, Vitality, Health, Mana, Defense and rest defined in the Stats Plugin)
- UseAbility (activates an ability when clicked)
- AutoAttack (replaces the players AutoAttack when equipped)
- ClaimObject (build the object from the item, if required materials are present in the backpack)
- CreateClaim (defines claim size numeric value, if clicked in the world allows the player to get the claim to the piece of land with specified size value)
- StartQuest (select quest from the list)
- Currency (select currency from the list) – automatically convert the item to the selected currency one to one
- BuildingMaterial (numerical value, defines health for building material) (currently not working)
- UseAmmo (Select Ammo type)
- Weight (how much weight that item has)
- Durability (value)
- CraftItem (select craft recipe, so this item will act like craft recipe item, if you hover over that item then tooltip will be presented with information taken from recipe definition from Crafting Recipes Plugin like materials required to craft result item and also result item itself with its parameters to inform player what he will gain by crafting that item)
- SpawnMob (will spawn mob which is defined in Mobs Plugin, the value is an integer and should reflect Mobs Template ID)
You can add multiple effects.
Requirements
Add Requirements – optional
Type: Type of requirement selected from the dropdown list that currently contains:
- Level (level of requirement – specify needed level)
- Skill Level (select skill and level of this skill, defined in Skills Plugin)
- Race (Select race from the list, defined in Option Choices Plugin)
- Class (select class from the list defined in Option Choices Plugin)
- Stat (Select statistic from the list and required value of this stat for the player that should have, defined in Stats Plugin)
You can add multiple requirements.
Ammo
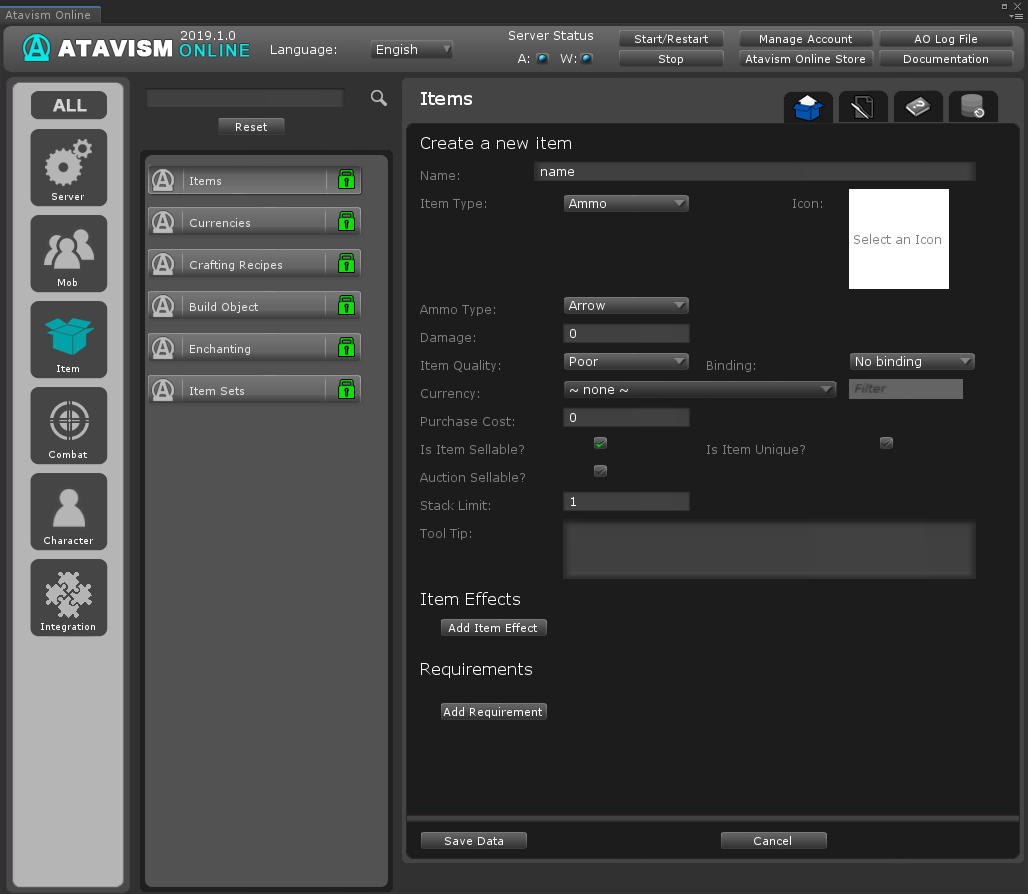
Create a new item
Name: Name of new Ammo
Item Type: Ammo
Icon: The icon that will be drawn in the GUI for the item.
Ammo Type: Select type of Ammo like Arrow or Bullet, but it can be defined in Option Choices Plugin
Damage Min – Damage Max: Numeric value of damage between min and max.
Item Quality: The quality of the item, higher quality items should be harder to find, and be more expensive. Does not have any effect by itself.
Binding: Defines the binding behavior of the item. Equip means the item cannot be given to another player once it has been equipped. The pickup means the item cannot be traded as soon as it has been picked up by the player.
Currency: What currency is used to buy and sell the item.
Purchase Cast: How much it costs to buy the item using the specified currency.
Is Item Sellable? Can the item be sold?
Auction Sellable? Can the item be sold on the auction?
Is Item Unique? A player can only have one of an item that is unique. (not working currently)
Stack Limit: How many of the item can be stacked together in a single item slot.
Tool Tip: A description of the item that players can view on the GUI.
Item Effects
Add Item effect: optional
Effect # Type: The type of effect the item has when equipped or used. Currently supports:
- Stat (allowing selecting statistic like Strength, Intelligence, Vitality, Health, Mana, Defense and rest defined in the Stats Plugin)
- UseAbility (activates an ability when clicked)
- AutoAttack (replaces the players AutoAttack when equipped)
- ClaimObject (build the object from the item, if required materials are present in the backpack)
- CreateClaim (defines claim size numeric value, if clicked in the world allows the player to get the claim to the piece of land with specified size value)
- StartQuest (select quest from the list)
- Currency (select currency from the list) – automatically convert the item to the selected currency one to one
- BuildingMaterial (numerical value, defines health for building material) (currently not working)
- UseAmmo (Select Ammo type)
- Weight (how much weight that item has)
- Durability (value)
- CraftItem (select craft recipe, so this item will act like craft recipe item, if you hover over that item then tooltip will be presented with information taken from recipe definition from Crafting Recipes Plugin like materials required to craft result item and also result item itself with its parameters to inform player what he will gain by crafting that item)
- SpawnMob (will spawn mob which is defined in Mobs Plugin, the value is an integer and should reflect Mobs Template ID)
You can add multiple effects.
You can create Ammo Items in the Items Plugin, create second Item (Weapon) in Items Plugin set UseAmmo effect for it and set ammo used for Ability in Abilities Plugin.
Requirements
Add Requirements – optional
Type: Type of requirement selected from the dropdown list that currently contains:
- Level (level of requirement – specify needed level)
- Skill Level (select skill and level of this skill, defined in Skills Plugin)
- Race (Select race from the list, defined in Option Choices Plugin)
- Class (select class from the list defined in Option Choices Plugin)
- Stat (Select statistic from the list and required value of this stat for the player that should have, defined in Stats Plugin)
You can add multiple requirements.
Configuration
Another example is crafting where you can define materials and result items.
Questing also has items to define a reward where you can have rewards and optional rewards.
Items are also presented as gathered items for example materials like ore or wood or any kind of resources you would like to have in your game.
Finally, items are part of merchants trade system, where you can define something we called merchant table, which contains items available for purchase for a player when he will talk with a merchant.
Getting characters/mobs ready to equip items The first step in getting items and loot ready for your game is to prepare the characters to equip items. A new Script needs to be added to your character prefabs: AtavismMobAppearance. You then need to set the bones or sockets for the key item slots. This is achieved by dragging the prefab into a scene, finding the child object in the prefab for the slot in question, and dragging that into the slot in the component on the prefab. Once all the slots are set (Only need to worry about Main Hand and Off Hand for the moment).
Creating an Equipment Display For items that can be equipped an Equipment Display prefab is required. These are found under Resources/Content/EquipmentDisplay. Equipment displays are simple – Duplicate an existing one (an example one is provided), give it a new name and drag in the model to the model property.
Creating Items Click on the Items button in the left pane then on Items in the second pane. There are a lot of details here but a few are not active yet. The important ones that need to be filled in are:
-
Item Type (This is critical, it determines how the item works, choose the option that makes sense)
-
Item Sub-Type (Choose the one that makes sense)
-
Name (The name of the item)
-
Equipment Display (Only used for weapons/armor. Drag in your prefab here from the EquipmentDisplay folder found under Resources/Content/)
-
Slot (Only used for weapons/armor. Where the item gets equipped)
-
Damage amount range (Weapons Only. How much damage the weapon does)
-
Delay (Weapons Only. How long between attacks when using this weapon – 2000 = 2 seconds)
All details about attributes for items is described for each item type separately.
Setting up Loot The Loot system works by creating loot tables which can have numerous items inside, each with a specified drop chance, then giving loot tables to mobs with a drop chance of that table being used. When a mob is killed, a dice roll is done for each loot table the mob has. Then if a table is successful, a roll is done to determine which item from inside the table is dropped. Numerous loot tables can be successful, but each table will only drop one item.
-
Step 1 – Create a loot table
Click on the Mob/NPC button in the left pane then on Loot Tables in the second pane.Give the loot table a name, then choose an item from the dropdown, give it a chance to drop, and specify how many of the item will drop. To add additional items to the table click Add Item. Click Save when you are happy with your loot table.
-
Step 2 – Add the loot table to a mob template
Click on the Mob/NPC button in the left pane then on Mobs in the second pane to access Mobs Plugin. If you already have a mob, click on the Edit Mob button, otherwise make a new mob and click save. At the bottom of the page, there is a new button: Edit Mob Loot. Click it. Choose the loot table you want the mob to drop and the drop chance for it. Click Add Loot Table to add more.
-
Step 3 – Restart the server
With all changes to the database, you need to restart the server for it to take effect. Restart your server and your mobs will be ready to drop your loot!
Looting Mobs Upon killing a mob that has loot yellow particles will show up. Mousing over the dead mob will produce a new cursor: Right clicking on the mob will bring up a loot window showing you the loot available. Mousing over items will bring up a tooltip showing you the item name. Click on an item to loot it.
Using your Items At the bottom left of the screen you will have a bag icon, clicking it will bring up your inventory. You can right click on an item to equip/activate it or left click it to change the cursor to the item so you can move or delete the item. You can delete an item by left clicking on it to select the item, then move the cursor to an empty area of the screen and clicking again. A box comes up asking if you want to delete it. You can view your items equipped by clicking on the button on the top right.
Setting up UMA Equipment Display
Getting your equipment to display on your characters using the UMA system takes a few more steps with the exception of attached models such as weapons that go in the hand. You can get your UMA equipment working with the Atavism System by following these steps:
Creating the Slot and Overlay Data
The first step in getting your UMA equipment to work with Atavism is to set up the Slot and Overlay Data. It is recommended you copy existing Slot and Overlay Data for an existing equipment object (such as one provided by the UMA system). Rename the assets and change the fields needed such as the Mesh Renderer for the SlotData and the Textures in the Texture List for the OverlayData (make sure you also change the Name field so it matches the asset name exactly – this is a pretty common cause of errors).
Note: SlotData is only needed if you are making a piece of equipment that requires a new model if it just goes on the base skin the SlotData is not needed.
Creating the Equipment Display
Once you have your slot and overlay data sorted you need to make an Equipment Display. Go to the Resources/Content/EquipmentDisplay folder in Unity and duplicate one of the existing Equipment Displays and name it based on your new equipment. Note: You may have to re-attach the EquipmentDisplay component if it says it is missing. You will note there are 4 new fields: Male Slot Element, Female Slot Element, Male Overlay Element, and Female Overlay Element.
Drag your SlotData and OverlayData assets into the fields that match. For example, if you have created a SlotData and OverlayData for the female model, drag those into the female slots.
Create Your Item
Load up the Atavism Unity Editor and create your item as usual and make sure you drag your new Equipment Display into the slot when making it.
Wearing Your Item
Once you have made your item and restarted the server you should be able to get your item and equip it (and hopefully it shows up as it should). You can always type:
/generateItem #
Replacing the # with the item template number (which can be found in the Atavism Unity Editor) to get the item in your bag (easy for testing new items).
You can also run the command
/admin
and generate item from there by choosing it from the list of defined items.