Creating Mob Templates
Step 1 – Connecting to the Content Database
If you haven’t already, you need to make sure the Unity Editor can talk to the Content Database. Bring up the Atavism Unity interface by clicking on Window → Atavism Online. From there choose the Server button on the left then choose Data Base in the second pane.
Fill in the Database Host, Name, User and Password details and click Test Connection. If it doesn’t come up with Success, you have got your connection setting incorrect, or you do not have access to the database you are trying to connect to.
Step 2 – Set up the Prefab
A mob template requires a Unity Prefab which will contain the model and other appearance information for the mob in the world. Place the model in the world that you want to use for your mob then drag it from the Hierarchy into the Resources folder for your project. You now have a Unity Prefab. A Mob controller script, Atavism Mob Controller script and a Character Controller all need to be added to your prefab. If you want to reduce workload and use recommended by unity Asset Bundles then they are also supported by Atavism and detailed information how to setup and manage them can be found in Asset Bundle Configuration section.
Step 3 – Creating the Mob Template
Click on the Mob/NPC button in the left pane then on Mobs in the second pane.
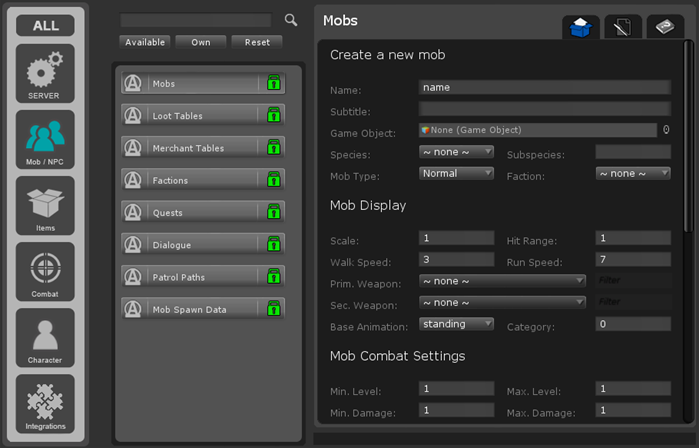
There are a lot of details here but a few are not active yet. The important ones that must be filled in are:
- Name: The name of the mob, will appear above the mob unless it is an Untargetable one.
- Subtitle: The subtitle of the mob, will appear above the mob and below the name unless it is an Untargetable one.
- Game Object: Drag in your prefab here from the Resources folder that was specified in the previous step.
- Species: Choose the species of the mob. The list of options can be edited from the Option Choices.
- Subspecies: The subspecies of the mob.
- Mob Type: The type of mob. Generally Normal, but can be set to Untargetable for mobs that can’t be targeted, or Boss/Rare for other special cases.
- Faction: The faction the mob belongs to. The faction influences how the mob will react to players and can be set up in the Factions plugin.
- Hit Range: How far away other players/mobs can hit this target from (in meters). Giant mobs (such as a dragon) may have a large hit range so players don’t all have to crowd round its belly. Not currently working.
- Walk Speed: The speed the mob moves when roaming around or patrolling. (it’s overwritten by movement_speed form stats)
- Run Speed: The speed the mob moves when in combat and chasing down an enemy. (it’s overwritten by movement_speed form stats)
- Primary Weapon: The item (weapon) that is attached to the mob’s main hand. This will influence the damage it deals.
- Secondary Weapon: The item (weapon, shield or other) that is attached to the mob’s off hand. Any stats on the item will be applied to the mob.
- Base Animation: The animation state the mob is in by default (standing, swimming, flying). Only standing is supported by the default Mob Controller, but can easily be modified to handle all states.
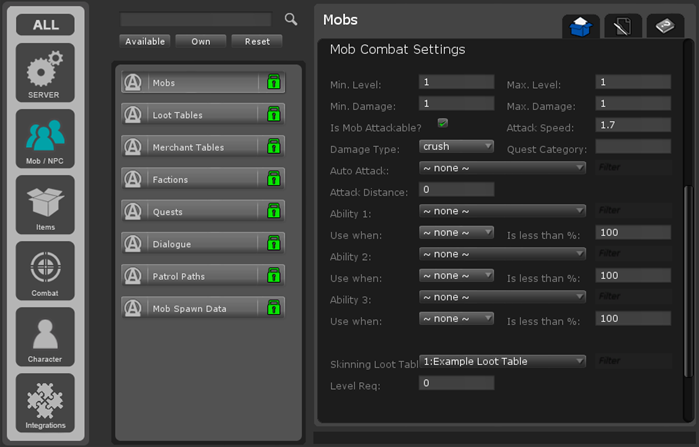
- Min. Level – Max Level: Levels from which server will randomly choose value and spawn mob with that level.
- Min. Damage – Max. Damage: Damage range from which server will randomly choose a value and calculate damage based on that.
- Auto Attack: The ability the mob uses to attack. The mob will use the ability every time their cooldown has completed which is based on their attack speed.
- Is Mob Attackable?: Determines if the mob can be attackable or not.
- Attack Speed: Speed of auto attack
- Auto Attack: Defines an Ability from Combat / Ability Plugin, which will be used for Auto Attack for mob
- Ability 1: Defines an Ability from Combat / Ability Plugin, which will be used for Ability 1
- Use when and Is less than %: Defines condition when the mob will use Ability 1 for example when HP is less than a percentage.
- Skinning Loot Table: Defines loot table which will be dropped from the mob after skinning skill will be used on it after his death. SKINNING_SKILL_ID is required to set for that task, which can be found in the Game Settings Plugin.
- Level Req: Defines required level of skill to allow skinning mob
Finally, click save data and your mob template will be created.
Step 4 – Spawning the mob
After a mob template has been created the server will need to be restarted before being able to spawn it. To then spawn the mob please read Spawning Mobs.